Mastering the L Curl: Creating the Perfect Eyeliner Effect
Your bag
It’s less commonly used, and for some lash artists, it’s a curl they’ve never reached for or one they’re a little afraid to use.
But when you understand why, when, and how to use it, the L curl can completely change the way you approach certain lash styles.
Our Global Director of Education, Tammy, dives into the L curl on her latest webinar and shows how to use it intentionally to create an advanced lash look: a striking, elongated eyeliner effect.
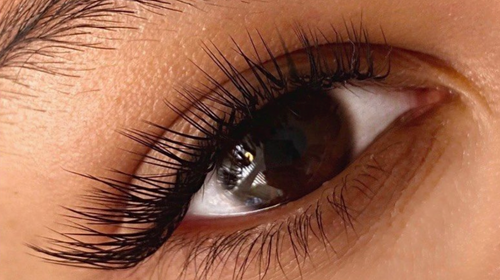
True to its name, the L curl actually resembles the letter L. It features a sharp base, a sharp transition, and a lifted tip, creating a very different profile from more rounded curls.
Its flat bonding base provides more surface area for attachment, making it especially useful for straight or downward-facing natural lashes. Because the base sits low and straight along the lash line, it can also help create the appearance of more density near the lash line.
And then there’s the lift. The L curl gives you a dramatic, visible lift without the roundness of a traditional curl. The result is an elongated look with a very distinct, straight lift.
The eyeliner effect isn’t simply about choosing an L curl and placing it on the outer corner. Mapping, curl, and direction all have to work together.
With the L curl, the extension visually travels outward before lifting, creating that elongated, winged appearance that mimics the look of eyeliner.
Tammy breaks down exactly how direction plays into this effect and why the way you direct the extensions can make or break the final result. She also compares a traditional cat-eye map to an eyeliner-style cat eye, showing how subtle changes in mapping can create a completely different finish.
The L curl can be an incredibly effective tool, but only when you’re using it with a specific result in mind.
Not necessarily.
Tammy walks through the eye shapes and natural lash characteristics that can benefit most from this style, including:
Almond-shaped eyes
Upturned eyes
Clients wanting more elongation
Clients who regularly wear winged eyeliner
Natural lashes that can support the desired style
But there are also clients where this technique may not be the best choice. Downturned eyes, for example, can sometimes appear even more downturned with an L curl. Very wide-set eyes and clients with heavy lid hooding may also require a different approach, as the winged effect can become less visible.
Before reaching for your L curls, Tammy emphasizes the importance of looking at the eye shape, natural lash direction, and available lid space.
No! You can absolutely create an eyeliner-style look using classic lashes. The main difference is going to be the level of density. Classic will give you a softer, more natural version of the effect, while volume can build up the density needed to mimic a more defined eyeliner look.
Tammy’s webinar explores how you can approach the style with different techniques depending on the result your client is after.
Tammy also gets into troubleshooting some of the most common issues artists run into when working with the L curl, including:
The wing looks too droopy
The eyeliner effect isn’t showing up.
The L curl grows out looking messy
She breaks down why these issues happen and, more importantly, how to correct them.
If you’ve been avoiding the L curl because you’re not quite sure how to use it, this is a great place to start. And if you already use it but feel like your results aren’t as consistent as you’d like, Tammy’s approach will give you a whole new way to look at it. Because creating an eyeliner effect isn’t about simply picking up an L curl.
As beauty professionals, we know that sometimes the smallest details can make the biggest difference.
I'm sure it's happened to most of us at some point.
Last week, I hosted a Korean Lash Lift Masterclass where we broke down this trending technique and how to perform it using the Sugarlash PRO Lash & Brow Lift System.
The L curl is one of those curls that doesn’t get nearly as much attention as it deserves.